We use essential cookies to make our site work. With your consent, we may also use non-essential cookies to improve user experience and analyse website traffic.By clicking 'Allow All', you agree to our website's cookie use as described in our Cookie Policy.
You can change your cookie settings at any time by clicking “Preferences”.
Preferences
Allow All
Preferences
We use different types of cookies to optimise your experience on our website. You may choose which types of cookies to allow and can change your preferences at any time. Click the buttons below to change your settings. Disabling some types of cookies may impact your experience. For more information visit our Privacy Policy.
Necessary
Our website needs some cookies to perform its basic functions for example, remembering which page you are on, setting your preferences, and logging in. These cookies cannot be turned off. These cookies do not track you or collect any personal data.
Always Permitted
Functional
These cookies enable this website to provide enhanced functionality and personalisation. They may be set by us through software we have added to our pages. If you do not allow these cookies then some or all of these services may not function properly.
Not permitted
Analytics
These cookies are set by our online advertising partners (mainly Google Analytics). Our partners use them to better understand your interests, and to show you personalised ads on our website and on other sites. They do not identify you directly, but do uniquely identify your device and browser. If you do not allow these cookies, you will be shown less personalised ads online.
Not permitted
Marketing
These cookies are set by our online advertising partners (mainly Google Analytics). Our partners use them to better understand your interests, and to show you personalised ads on our website and on other sites. They do not identify you directly, but do uniquely identify your device and browser. If you do not allow these cookies, you will be shown less personalised ads online.
Not permitted
How To Start a Podcast In 5 Steps Using RØDE Connect
Released 02 Jul 2021
Do you want to get into podcasting but you’re not sure how to get started? You don’t need tonnes of equipment and years of audio experience to make a great podcast. In fact, all you need is a microphone, a computer, and a great idea.
Below, we’ll show you how to start a podcast in 5 simple steps using RØDE Connect.
Before you get started, make sure you have everything you need, including a computer, NT-USB Mini microphone, and a pair of headphones. If you are podcasting with multiple people, you will need a microphone and a pair of headphones per person.
Ready? Let’s go.
Step 1 – Download RØDE Connect
First, you’ll need to download the RØDE Connect software. It’s completely free, with versions for Mac and Windows available. Once you have downloaded the installer file, follow the prompts to install the software and then open it.
Step 2 – Plug in Your NT-USB Mini
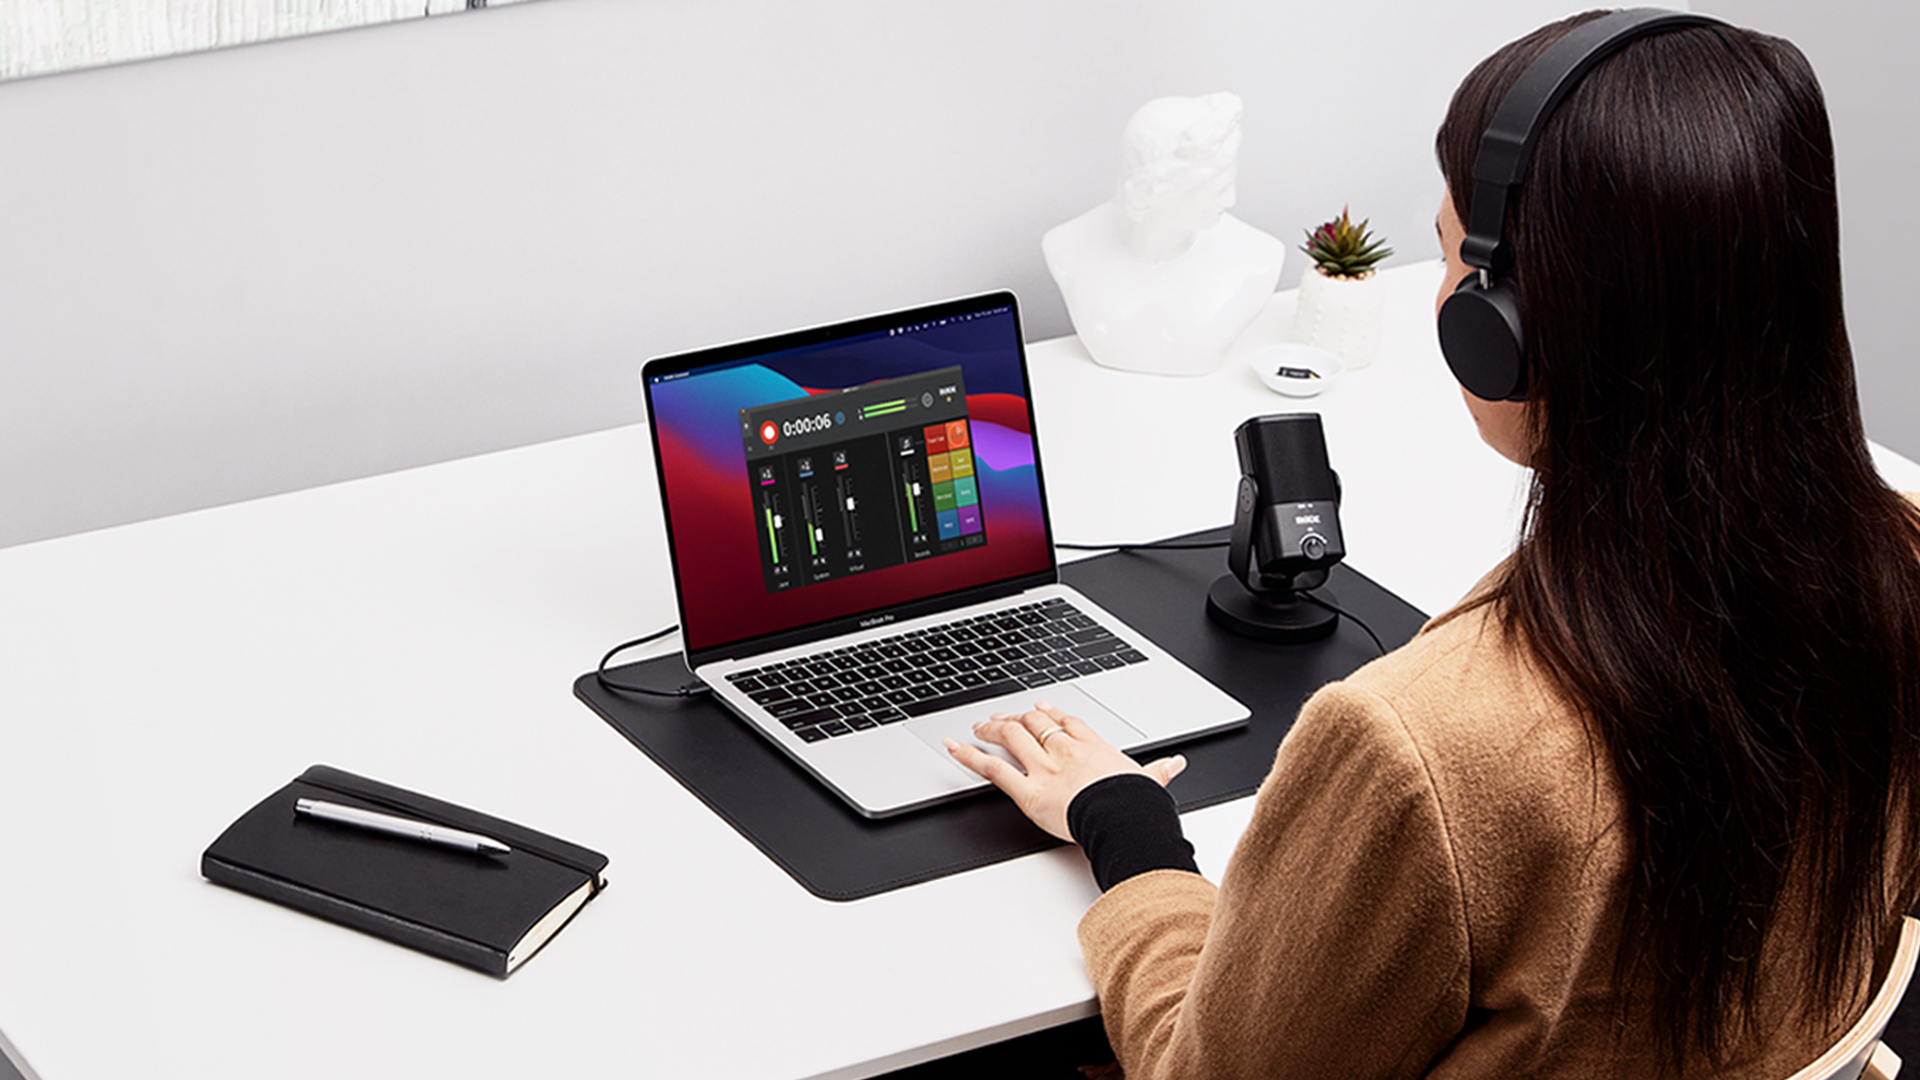
Plug your NT-USB Mini into your computer using the supplied USB cable. If your computer only has USB-C inputs, you’ll need a USB-C to USB-C cable like the RØDE SC17. This is a Hi-Speed certified, 1.5m cable that is perfect for use with the NT-USB Mini.
Next, plug your headphones into the back of the NT-USB Mini so you can hear yourself (and your guests if you have them).
Step 3 – Assign Your Audio Channels in RØDE Connect
Once connected, your microphone(s) will appear in the RØDE Connect setup assistant. You may be prompted to update your microphone’s firmware if a new version is available.
To assign your microphone to a channel, simply drag and drop it into one of the numbered boxes. If you are using multiple microphones, click each of the microphone icons in RØDE Connect to make the LEDs flash on corresponding the microphone. This makes it easy to identify which mic you are assigning to which channel.
You will also notice the channels are colour-coded. These match the RØDE COLORS, a set of identification tags for the NT-USB Mini that make it super easy to keep track of which microphone is connected to which channel while recording.
Once you’ve assigned your microphones, click ‘Next’. This is the ‘Virtual Channels’ page. These are used for adding external audio like phone calls and music into your podcast, which you can explore later. For now, click ‘Finish’.
Step 4 – Adjust Your Levels
You are almost ready to start recording!
Before you do, be sure to check your microphone audio is at a decent recording level. Click the channel number icon for your microphone. You will see a horizontal level meter with ‘+’ and ‘-’ buttons underneath. Talk into your microphone at the volume you will be recording and watch the level meter. While you are talking, it should sit within the green section of the meter. If it is in the red section or not quite hitting the green section, use the +’ and ‘-’ buttons to adjust your level.
You can also add processing to your voice by toggling the noise gate, compressor, and APHEX Aural Exciter and Big Bottom effects on. These will give your voice a rich, warm tone just like on a professional podcast. To learn more about these processors, click here.
Click the channel icon again to exit the options menu. Repeat the process above for any other microphones you have connected.
Step 5 – Hit Record!
Now you are ready to record! Click the red record button on the top left of RØDE Connect to start recording. Once you’ve finished recording, press the button again to stop.
You can listen back to your podcasts, rename them and export them to any podcast platform from the ‘Recordings’ page, accessed via the tab to the left of the record button.
That’s it – you’ve just made a podcast!
To find out more about RØDE Connect, including using the sound pads, adding external audio and recording remote guests, exporting your podcasts, and more, check out the RØDE Connect Learning Hub.
For a quick visual overview of the steps above, take a look at the video below.